Thursday, 31 January 2013 - , , 34 comments

USEFUL STUFF : Morphy Richards Soup Maker


I was given this Morphy Richards soup maker for Christmas as a gift from my parents. I have to say, at first, I was a little sceptical...soup is so easy to make in a pan, why would I need this device?
Well, after 1 month of using it (almost every day!) I am totally hooked.

***

Those of us on a low fat eating plan know that soups are a great filler, especially for our tricky, nibbly times of day....so I always have a pot of something on the go. One of the things I have found, is that I tend to make enormous vats of homemade soups, which I get bored with after a couple of days. So, this is ideal as it makes 4 generous bowlfuls, then I'm onto the next batch! My regular pan also takes up a large space on my hob...and this uses a small section of my work top and is out of the way of other cooking activities.

***


So...the soup maker consists of two pieces; a large 'kettle' shaped base and a motor/blender section.


I just pop a variety of vegetables into it along with any seasoning of my choice.
Fill it with water up to the maximum level. This makes 4 generous bowls of soup.


The soup maker has two main settings- smooth and chunky, so you can set these as pre-set options. If you're not sure how you want your finished soup, you can leave it chunky, then blend to your required consistency afterwards.
One of the main surprises I had is the speed at which the soup cooks, especially if you are making a smooth, blended soup.
I can make a finished batch of my Magical Mushroom Soup (Click HERE for recipe) in 20 minutes. The best thing is that I don't have to use my hand blender to blitz the soup after cooking (less washing up!). I can pop the machine on, take the dog for a quick walk around the block, and in 20 minutes I have piping hot (crazily hot!), blended soup. I just have to chop the veggies smaller than I normally would, to save space in the machine.
It's also fab for me because my husband works from home two days a week, and he doesn't cook. So, if I'm going out I can pop a batch on for him and I know he will eat a wholesome, heart-healthy lunch even when I'm not around.


Here are some of the soups I've made in recent weeks using my machine.
The only drawback I have experienced is that you can't reheat your finished soup in the machine so, unless you eat it immediately, you do have to transfer to a pan or microwaveable container for reheating. It's not a big deal, but worth a mention and would be a great feature in future models please Morphy Richards!

***

It is hassle-free to clean-
a big plus in my book!
The soup maker retails at around £50, so is quite a major purchase or very generous gift..but well worth considering if you make soup most days, like me.

***

The machine can also be used for cold fruit smoothies...so I'll be trying that feature when the weather warms up!

***

Super Souper.

SMASH & GRAB : Tasty Veggies


Some days I find myself with an insatiable hunger...and it's usually on a day when I don't have many Propoints to 'play' with.
This is a great way to stave off the hunger.

***

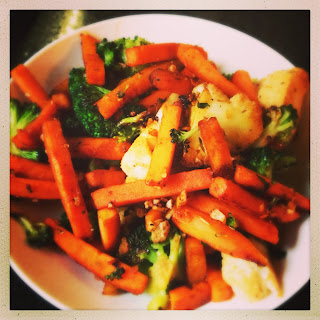
Simply take a large bag of mixed 0pp veggies- broccoli, cauliflower and carrot works well for me.
(No potatoes, sweetcorn, peas or parsnips).
Steam or zap them in the microwave for 2-3 minutes.
Chuck them in a pan with some chopped garlic, coriander, black pepper, low-salt soy sauce and a little piri-piri seasoning if you like a kick.
Stir-fry in a few sprays of Frylight oil until they start to char on the edges.
Squeeze some fresh lemon juice on top.

This will fill you up deliciously in no time.

***
Saturday, 26 January 2013 - , , , , 4 comments

RECIPE : Chicken Kiev


One of the reasons I started Slice-of-Slim was to reassure intrepid dieters that they do not have to live without their favourite foods. There is nearly always a way to recreate the dishes we love in a low fat way.

***

Even though I've been at my goal weight for over 2 years, I still go to my WeightWatchers meeting every week. It's my way of keeping a check on myself and having the support of other people who have been on the same journey. We have a Facebook page too, set up by our wonderful leader, so we can communicate during the week and 'chat' to others from surrounding meetings.
Last week on this Facebook group, a member was saying how much she missed an old favourite, Chicken Kiev. She was so envious of the rest of her family, who had
"just eaten chicken kievs with all the butter drizzled over chips".
Those kievs were 'tiny' and each one was 12pp (Around 500kcal).
She asked me if I could come up with something to help this craving...and here is the result!
With very little compromise, I've managed to create a delicious, authentically oozy,
standard-sized kiev
for only 7pp/approx.280kcal
that will blow your socks off!

***

You Will Need : (Per Kiev)

1 165g Chicken Breast
1 slice WeightWatchers White Danish Bread
1 egg white
(or 1 tablespoon 2 chicks egg white)
10g low fat spread 
(I used Tesco Olive Light. This is 1pp/35kcal for 10g. Please check pp/kcal if you use a different brand)
1 clove garlic
Dried Herbs
Black Pepper
Frylight Oil

***


Start by weighing the low fat spread accurately into a small ramekin dish. If you are making more than one chicken Kiev, use a separate pot for each portion.


Crush the garlic into the pot. If you like this dish really garlicky, use one clove of garlic per person. For a milder flavour, half a clove is enough.


Add herbs and black pepper. Mix together thoroughly.


Make a small cut into the side of the chicken breast, only just wide enough to fill with the garlic mixture, but deep enough to reach the centre. Fill the hole with the mixture using a teaspoon, then push it as far into the middle of the breast as you can with your finger. 


Pop the bread into a food processor and blitz until you have fine breadcrumbs.


Prepare 2 bowls-one for the egg white and one for the breadcrumbs.


Close up the hole in the side of the chicken breast. Dip the chicken into the egg white, coating evenly.


Transfer the egg-coated chicken breast to the breadcrumbs, pressing them on to coat the breast generously and evenly. Put the prepared Kievs onto a plate and pop into the fridge for 20 minutes. This will ensure that the low fat spread chills so is less likely to leak out of the chicken when cooking.
While they are chilling, preheat the oven to 200 degrees centigrade.


After 20 minutes in the fridge, place on baking parchment, mist with Frylight oil and bake for 30 minutes until the breadcrumbs are beautifully golden.
They are delicious served like this with 0pp butternut squash chips (so you can drizzle them with the garlic butter!) and a fresh salad.
(Click HERE for how to make Butternut Squash chips).


Alternatively, serve with spaghetti and a simple tomato sauce which is equally delicious.


When you cut into the chicken Kiev, you should have a fabulously crispy coating, succulent, perfectly cooked white chicken with a garlicky, buttery-flavoured melted centre oozing with deliciousness.

***

Mission accomplished!

***


***

Gorgeous vegetarian version to follow shortly which are only 2pp each!


Friday, 25 January 2013 - , , , 0 comments

RECIPE : Cheaty Baked Jacket Potatoes


O.K. I know you don't need to be shown how to make a jacket potato....but if, like me, you are often time-short and you love them baked in the oven, here's my cheaty method!

***

Pop the oven on as soon as you walk in the door. (190-200 degrees centigrade).

Weigh your jacket potatoes and work out the propoints from their raw weight.
(I find it much easier this way)

Prick once with a fork and microwave for 5 minutes on high. The potato will be cooked unless it's a huge one!

Mist with a few sprays of Frylight oil and pop into the hot oven for 20 minutes.

This will produce a crisp, golden outside with a fab fluffy inside and takes 1/3 of the time of a fully baked potato.

***

Just for interest, the above meal
breaks down to;

1 medium potato 3pp
1 tin Sainsburys "Be Good to Yourself"
Tuna and Sweetcorn 2pp
1 sachet butter buds 0pp
1 individual portion Cathedral City Cheddar grated on top 1pp
Thrown together with a fab salad dressed with a little Balsamic vinegar 0pp

 That's 6pp for a delicious, quick, warm, filling meal.

***

This just hits the spot.
Thursday, 24 January 2013 - , , , , 1 comments

SMASH & GRAB : Banana Meringue Chocolate Fix


This is a wonderfully quick chocolate fix- amazing textures, melted oozy chocolate and warm cinnamon smells!
You can't really go wrong for 4pp/approx.200kcal.


Take a standard individual meringue nest.


Zap an individual pot (30g)of chocolate Philly for 15-20 seconds in the microwave. Dollop it into the meringue.


Slice a banana into and around the meringue.


Finally, sprinkle with cinnamon.

***

Ridiculously easy.
Tuesday, 22 January 2013 - , , , , , , , 2 comments

RECIPE : Easy Katsu Curry Sauce


Katsu Curry is a very popular dish in Japan and becoming a really well loved dish in this country too. It has to be one of my favourite meals. Traditionally, it's served with panko breadcrumb-coated fried chicken/tofu and rice so can be quite high in propoints/kcal. 
I'm going to give you my easy, basic recipe for the sauce which then has many applications.
I'll show you some ideas of how to serve it, keeping the Propoints/kcal as low as possible.

***

Katsu is a thick, smooth, mild curry sauce but still has a good strong kick. Think of a traditional Indian Curry flavour as the base. With the addition of soy sauce to deepen the flavours and mirin to sweeten, this Japanese sauce becomes a wonderful accompaniment to many other ingredients.

***

This recipe makes 
4 servings at 2pp/approx.80kcal per portion
or
2 generous servings at 5pp/approx.200kcal per portion

***

You Will Need: (For 2-4 servings)

1 tablespoon mild Curry Powder
3 tablespoons Cornflour
2 tablespoons Soy Sauce
2 tablespoons Mirin
1 teaspoon artificial granular sweetener
250ml water

***


Using an accurate measuring spoon, measure the curry powder into a cold saucepan.


Add the cornflour.


Measure the soy sauce and mirin into the pan.


Mirin is a great ingredient for sweetening salad dressings and Japanese-style dishes. It's a syrupy sweet cooking rice wine. It will make this sauce glossy and help to thicken it. It's available in most supermarkets. If you don't have any, don't worry, you can just use a little more artificial sweetener.
It's really important to use some sweetening agent in this dish as it counteracts the slight bitterness in the curry spices.


Whisk all the ingredients together, making sure that the cornflour is fully dissolved. This ensures no lumps.


Add the cold water and mix thoroughly.


Put the pan on the hob and bring to the boil on a medium heat, whisking or stirring constantly until it thickens.


It should be thick enough to coat the spoon.


Now you have a wonderful sauce with many applications....read on!

***

How to use your Katsu Sauce:


Serve traditionally, pouring over breadcrumb-coated chicken breasts/tofu and serve with rice.
You can bake the chicken/tofu or fry in frylight oil to keep propoints to a minimum.

Click HERE for my Chicken Goujons recipe.
You can make breadcrumbs from WeightWatchers white bread if you don't want to use crumpets.

*


Make butternut squash 'Chips' and use the katsu curry sauce as a dipping sauce.
The ultimate chips and curry sauce!

(Click HERE for my recipe for Butternut Squash Chips).

*


Add as a finishing touch to stir-fried noodles and vegetables.

(Click HERE for Stir-Fry Noodles recipe).

***

Delicious, fragrant, spicy, rich.

***

PRINT RECIPE HERE

Saturday, 19 January 2013 - , , , 2 comments

RECIPE : Rocky Road Popcorn Pops


I must have known subconsciously that everything was leading to National Popcorn Day today! First I met the Popcorn PR girls last week, then I blogged about Boots popcorn earlier this week. I invented these Rocky Road Popcorn Pops as a thank you to the aforementioned ladies after a great event, so thought I would share them with you. They are so easy to make, completely delicious and a fantastically low 2pp/approx.80kcal each!

***

You Will Need : (Per Popcorn Pop)

4g popcorn 
(I used the Boots Popcorn as it's very low in pp's. Click HERE for link. I mixed maple and salted together).
If you use a different variety of popcorn, check the pp/kcal as they vary enormously.
2 Sugar Free Marshmallows
(Sainsburys sell them)
4g Plain Chocolate
1/4 teaspoon Sugar Sprinkles


Put the popcorn and marshmallows in a small ramekin and microwave for 20 seconds until the marshmallows puff up. (They go huge!)


As soon as it comes out of the microwave, scoop out the mixture, gently pressing the popcorn into the molten marshmallow.


Insert a lollipop stick and compress the popcorn pop onto it until secure.
(These are actually rigid paper straws but I love the 'popcorn' theme to the colours).


Stick remaining popcorn onto any exposed areas of marshmallow, ensuring a lovely round shape.


Make as many as you require.


Drizzle the top with melted chocolate and add a few sprinkles. Allow to set.


If they are for gifts, wrap each one in a cellophane bag and tie with string.


I used some raffia saved from a bouquet of flowers. Add personalised tags.
These are my business cards with small holes punched in.
(I've written the propoint value on the back). 

***

Popcorn in a pop!

***

PRINT RECIPE HERE

***

TIP


If you don't have any sticks, make Popcorn Cupcakes instead!
Friday, 18 January 2013 - 3 comments

Hot Off The Press NEWS : Bloggers PR Event


This is an unusual post for me as it doesn't contain any recipes! I thought I would use it as an opportunity to describe a little of what goes on behind the scenes as a blogger and where I stand about endorsing products.


So...towards the end of last year, I had a lovely invitation from a company called Popcorn PR, inviting me to a WeightWatchers Bloggers event in January. I wrongly assumed this was something to do with WeightWatchers UK! It turned out that Popcorn PR manage accounts for a few of the WeightWatchers licensed foods that we buy in our supermarkets-so it's quite a separate entity.


I hadn't been to an event like this before and after a warm welcome, I was ushered straight in for a manicure with the lovely Girlie Night In girls.


The reason for the event was to raise the awareness of the array of WeightWatchers products out there. As a passionate WeightWatchers member, I was aware of all of these products but hadn't necessarily tried them all before. One of the details that impressed me the most was that every single food on offer had a clear label stating the Propoints. This meant that I could relax and enjoy myself without having to 'guesstimate'
and was able to track everything I tasted. Attention to detail is always a winner for me!


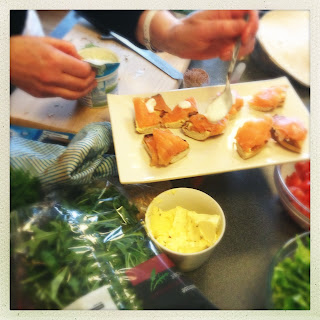
In the kitchen, a home economist was making delicious nibbles for us all to taste using the products...


Of course, I really felt at home with the food prep, so I couldn't miss an opportunity to take some images of all these fresh ingredients and finished dishes!


I met some really interesting bloggers-some with WeightWatchers orientated blogs like me and also lifestyle bloggers and health and beauty journalists who were not so familiar with the plan. There was an inspirational WeightWatchers leader there too, so she could answer any questions about the plan itself.


After a great afternoon, we were sent home with a goody bag full of samples...and this is where I want to make a point to you.
As a blogger, I am not paid by anyone to promote their products. I don't earn any money directly from my blog. Paid commissions may come as a result of the blog and that is always a bonus. I write it because I am enthusiastic and passionate about the plan and want to inspire anyone on their personal weight loss or maintenance journey.
There are some super and useful WeightWatchers products and I'll post about some of them over the next few weeks, but if I review or show a product, it's because I would use it and genuinely rate it, not because I have been given it for free!

***


As a little thank you to Popcorn PR, I created these Rocky Road Popcorn Lollipops especially for them. At 2pp each, I'll be blogging them for you next week!

***