Wednesday, 31 October 2012 - , , 4 comments

CUPBOARD LOVE : Cellophane Food Gift Bags


These little clear, cellophane bags are a great find. You may be thinking about making friends and family some delicious home-made edible goodies for gifts - especially around Christmas time.

***

I bought these in Waitrose and I think they're really good value;
£2.29 for 50 bags.
(Measuring 20 by 28cm).
Lakeland also do a pack - same quantity, same price.

***

They're good quality, flexible, gusseted bags so will hold the food in a professional way and are soft/pliable enough to be tied with some pretty ribbon for a lovely gift.
Monday, 29 October 2012 - , , , , , , 0 comments

RECIPE : Huevos Rancheros


Huevos Rancheros, or 'Rancher's Eggs', is a traditional Mexican breakfast dish consisting of eggs served with spicy tomato sauce.
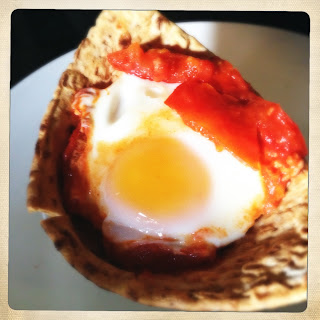
My version has a crispy, toasted wrap 'bowl' to house the delicious, rich tomato sauce. This contrasts beautifully with the soft, creamy poached egg which is snuggled inside.
This dish is delicious for breakfast, brunch or a light snack. You could even class it as a side dish to a larger breakfast served with some low-fat sausages.
It works out to 5pp/approx.250kcal per portion.

***

You Will Need: (Per Serving)

1/2 a Warburtons Squareish wrap
15g Chorizo/Quorn equivalent
2 fresh tomatoes
1/2 clove garlic
Pinch chilli flakes
4 tablespoons passata
1 medium egg
Fresh herbs
Paprika

***


Start by folding half a Warburtons Squareish wrap into a 'bowl' shape in a ramekin dish. Spray with a little Frylight Sunflower oil.


Place another ramekin on top so that the wrap keeps its shape when cooking.
Bake at 200 degrees centigrade for 10 minutes, then turn the oven down to 150 degrees and remove the top ramekin to allow the base to cook through. (About 5-10 minutes)


While the wrap is baking, fry the chorizo in a small frying pan with roughly chopped fresh tomatoes. If you make more than one portion, use separate pans so that you can keep control of your weighed portions of chorizo.


Add the garlic, chilli flakes and passata to the tomatoes. You can make this as mild or as spicy as you like. Cook for a minute, then make a well in the centre. Add the egg.


Pop a lid on the pan and allow the egg to poach gently in the bubbling tomatoes. This should take around 5 minutes.


Place the wrap 'bowl' onto your serving plate. I leave it in the ramekin dish to give it the support to hold the mixture. 


To serve, put some of the tomato mixture in the base of the wrap 'bowl'. Carefully, add the egg.


Pile the rest of the tomato mixture on top but leave the egg 'peeping' out. Garnish with fresh, torn herbs of your choice. Sprinkle with paprika.


 You could make this more authentically Mexican by serving it with some reduced fat sour cream or creme fraiche and some guacamole. Add any extra propoints/calories if you do this.

***

A Ranchy Breakfast!

***

PRINT RECIPE HERE

Saturday, 27 October 2012 - , 0 comments

HALLOWEEN!! : Munchkin Pumpkin Tealight Holder


If you can't face carving an intricate pumpkin but want to get into the Halloween spirit, these tiny little 'Munchkin' Pumpkins make perfect tea light holders. I had to buy a couple for the name alone!

***

This is the last of my Halloween ideas and quite a fun one to make over this chilly weekend. They're really easy to make and look so adorable once lit.


Take your munchkin pumpkins. (The one at the back has holes made with a bamboo skewer to hold my Sour Apple Screamers).


Take a tealight candle and draw around it onto the pumpkin to produce a cutting template.


Using a small, sharp knife, cut out the circle keeping the knife as vertical as possible .


Pull the cut section away. Keep it to use as a lid when the candle is unlit.


Scrape out any unwanted debris, then push the tealight inside. It should fit perfectly.


Use these as a decorative feature for your dining table, windowsill or to light the way to your front door for visitors,
(Trick-or-Treater's, or not)!

***

Happy Halloween!

***

TIP

You could use a tiny little ceramic dish as your template, then use these to house Warm Chocolate Dipping Sauce.
(Put the lid on to serve).
Serve with fruit and marshmallows and a fondue fork for dipping.
Thursday, 25 October 2012 - , , , , , , , 4 comments

HALLOWEEN!! : 'Cheaty' Pumpkin Crumble


Remember I suggested saving the pumpkin flesh from my pumpkin 'bowls' in my recipe earlier in the week? Well, this is the reason why - a really simple, low-propoint idea for a yummy little dessert!
These work out to 2pp/approx.110kcal each, or you can have two for 3pp/approx.220kcal!

***


So- this is the pumpkin flesh. Cover with cling film and microwave until soft and 'mashable'. This amount took two 5 minute bursts in the microwave. I didn't add any water.


Mash with a fork and add artificial sweetener and cinnamon to taste. I like it sweet and spicy, so I added 1 tablespoon cinnamon and 2 tablespoons sweetener.


Dollop into ramekin dishes while still hot.


Add 1 teaspoon 0% fat Greek yoghurt. Don't mix it in, just leave it as a blob. This counteracts the sweetness of the pumpkin and adds some creaminess as you eat it.
At this stage, the pudding is 0pp!
Choose an Alpen light bar in your favourite flavour. I love the Apple and the Chocolate/Orange variety.
(These are 2pp/70kcal each or 3pp/140kcal for two bars).


Break up the Alpen light bar into small, chunky pieces. They crumble very easily to form your topping.


Add to the pumpkin and yoghurt mixture in a generous layer. Tuck in!

***

Sweet, spicy, creamy and crunchy.

***

TIP
If you don't like pumpkin, try this with cooked, mashed apples or pears mixed with cinnamon.

***
Wednesday, 24 October 2012 - 0 comments

CUPBOARD LOVE : Quinoa with Bulgar Wheat


I used this quinoa/bulgar wheat mix in my Halloween Salad this week, but wanted to tell you a little more about it.
This particular mix came from Waitrose. I suppose I could have assembled my own mixture from mixed grains, but something about this tiny, attractive combination inspired me.


I love the fact that, because these grains are so tiny, they only take 12 minutes to cook. They absorb flavours easily, so you can add stock, soy sauce, herbs or even pesto to the cooking water to ring the changes. Grains fill you up too-a 50g uncooked weight portion (5pp) may look small but makes a meal extremely filling and may help you to stop needing a nibble later in the day.

***

Try substituting rice for these grains when you have chilli con carne for a change, or adding to soups or salads to bulk them out.
Monday, 22 October 2012 - , , , , , , 2 comments

HALLOWEEN!! : Roast Butternut Squash, Quinoa & Feta Salad


I've put this recipe under my Halloween umbrella simply because I've served it in a bowl made of pumpkin! Halloween may be for kids...full of spooky, gimmicky ideas (Click HERE for my Sour Apple Screamers),....but this salad is a celebration of the vibrant, Autumnal colours in the seasonal foods available at the moment. It's also delicious and filling-perfect if you have to accompany your little ones on their 'Trick or Treat' escapades-you need to keep your energy levels up!

***

Seriously though, I think this one's a real show-stopper. I love a warm salad in the cold, damp weather; Citrusy salad leaves, topped with warm, roasted butternut squash and chewy garlic...creamy, crumbly feta and soft, filling grains. A crunch of mild red onion and juicy pomegranate to top it all.
Its a feast for the eyes and very satisfying for the stomach!
You could serve this as a starter for a dinner party, or a robust and yummy main meal any time of the week.

***

My recipe makes:
2 generous portions for 7pp/approx.440kcal
per portion,
or
4 small portions for 4pp/approx.220kcal
per portion.

All I ask if you are making more than one portion, is that you apportion the quinoa and the feta evenly into separate, weighed individual portions before assembling the salad, as these are the ingredients containing the propoints. It's so important to measure these ingredients accurately and not have a "that'll do" approach, as an added propoint here and there will affect your weightloss or maintenance efforts.

***

You Will Need : (2 large or 4 small portions)

1 medium pumpkin
100g Quinoa/Bulgar Wheat 
(I used this lovely mixed pack)


1 teaspoon low salt stock powder
1 medium butternut squash
8 cloves garlic, skin left on
100g low fat feta cheese
Fresh thyme
Fresh basil
Salad leaves
(I used a mix containing beetroot)
Juice of 1 lime
1 mild red onion
1 pomegranate
Paprika
Black pepper

***


Weigh out the quinoa or grain of your choice. I loved this mix because the grains are tiny, delicate and mixed colours. Most of these grains work out to 1pp per 10g dry weight, but check on the packaging of the grain you choose. Cous-cous would also work well in this recipe.


Cook in boiling water with 1 teaspoon stock powder for added flavour. This particular variety takes 12 minutes to cook. Leave to drain.


Although I serve this in pumpkin 'bowls', I don't personally like pumpkin as much as butternut squash-I find the texture very 'mushy' even when roasted.
So...peel then cut the butternut squash into small cubes. Mix with the unpeeled garlic cloves and some fresh thyme. Spray with some Frylight Sunflower oil before popping on a baking tray in a preheated oven for 50 mins-1 hour at 200 degrees centigrade. 


While the butternut squash is roasting, prepare the pumpkin 'bowls'.


Cut the pumpkin in half. Scoop out and discard the seeds. With a metal spoon, scoop out most of the flesh of the pumpkin, leaving about 1cm in the shell to form a bowl.


Pop the flesh in a bowl, cover and store in the fridge. (I have a lovely SMASH & GRAB recipe using this, coming up later in the week).


Fill each pumpkin 'bowl' with salad leaves, then squeeze fresh lime juice over them.


In separate mixing bowls, combine each portion of quinoa with the warm, roasted butternut squash. Open the roasted garlic cloves to reveal garlic 'toffee' - chewy, delicious roasted garlic. Just pull apart or chop the garlic and dot it into the salad mixture.


Apportion the feta cheese and crumble roughly into the salad mixture. Add diced red onion. Season with black pepper.


Heap the warm salad generously into the salad leaf-lined pumpkin 'bowls'. Sprinkle with chopped, fresh herbs, pomegranate seeds and paprika.


Finally, scatter a few more salad leaves around the edge of the bowl to make an attractive and appetising presentation.

***

Sumptuously Satisfying!

***

PRINT RECIPE HERE
Sunday, 21 October 2012 - , , , , , , 0 comments

SMASH & GRAB : Carrot Sticks With Marmite


Ok, you're going to love or hate this one! Sometimes, around 5pm or later in the evening, I get an attack of the savoury munchies. This snack seems to hit the spot for me.It's filling, tasty and keeps me occupied so I can't raid the fridge! Measure out 1 teaspoon marmite into a small dipping pot-this amount goes a long way as you only need a tiny amount on each stick. (Any more than this and you will have to charge for the propoints). Cut carrots into sticks and dip into the marmite.

***

Yum!
Thursday, 18 October 2012 - , , , 3 comments

HALLOWEEN!!!: Sour Apple 'Screamers'


I don't know about you, but I've always felt that the thought of a toffee apple is much more fun than the reality of eating one! They are so hard to bite into and the apple/toffee ratio weighs far too heavily on the apple for my liking!

***

So...I've come up with these chunky slices of crisp, green apple which have been soaked in sour lime juice before being encased in a thin coating of sweet, caramelised sugar. Somehow, these flavours just do something amazing when you put them together-they taste fragrant, like they have rose essence in them...but I can assure you it's simply apple, lime and sugar!
The way I cut them, they look like little screaming faces - cute and scary - perfect for Halloween!  
They work out to 2pp/approx.60kcal each, or 2 screamers for 3pp.

***

You Will Need: (For 10 'screamers')

2 Crisp, green apples, skin left on
Juice of 1 lime
150g caster sugar
1/2 cup water
10 Bamboo skewers


Using an apple corer, remove the core from each apple in one long tube shape. Slice each apple into 5 chunky slices before immersing them in lime juice.


Assuming that the main hole is a 'screaming' mouth, find a utensil to cut two eye shapes. Alternatively, cut little triangular eyes with a knife. Soak every slice well in lime juice. This will ensure no discolouration of the apple and will give each slice a fabulously tangy twang.


I will admit that caramelising sugar is tricky. It takes practice and can go wrong easily. The only tip I can give you is to add a little water to the sugar, heat gently and DO NOT STIR AT ALL!!! You can agitate the pan a little to mix the solution, but the less you do, the better.


Once the sugar solution has bubbled away for a few minutes and starts to darken to a golden colour, test the consistency by placing a small amount onto a plate.


As soon as the caramel forms a 'blob' on the plate, it's ready. Still do not be tempted to stir it as it will crystallise.


Prepare the 'screamers' by threading onto bamboo skewers. Now you will need to work quickly. Have a glass nearby (on a plate to catch the drips), to pop them into once you have coated them in the hot sugar.


Dunk each one quickly but carefully into the hot sugar, allowing any excess to fall back into the pan before standing in the glass to set. Try to make the coating as thin as possible for a brittle, clear sugar shell that will crack as you bite into the crisp, sour apple.
Repeat until all are coated.


If you like, make some holes in a tiny pumpkin to use as a holder for your sour apple screamers.


Wishing you a fabulously screaming Halloween!

***

PRINT RECIPE HERE