Monday, 21 December 2015 - , , , , , , , 0 comments

RECIPE : Cranberry Sauce


This is probably the easiest little side dish you'll ever make!

***


Tip a punnet (200-300g) of fresh cranberries into a pan. Add 2-3 tablespoons artificial sweetener, juice of 2 clementines and 2-3 tablespoons of water.
Cook for 20-30 minutes.
Press the cranberries with the back of a spoon slightly to release the juices but don't puree or you will have to charge for the smartpoints! Pop into a serving dish. The sauce will thicken as it cools.

***

A tangy little sauce and a great way to save a few smartpoints/propoints on Christmas day!

***

Thursday, 17 December 2015 - , , , , , , 2 comments

RECIPE : Chocolate 'Truffles'


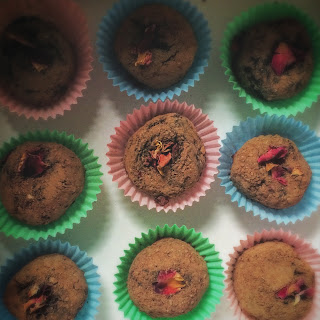
These delicious morsels are so easy to make, nutritious and very chocolate truffle-like even though they are basically made with dried fruits and nuts. A sweet 'fix' without the sugar or butter! Best of all there is NO cooking involved at all!

***

They work out to 2sp/1pp/approx 60kcal each 
(less than half the sp/pp/kcal of regular truffles)

***

YOU WILL NEED: (Recipe makes approx.16)

50g cashew nuts
50g raisins
100g dried dates
1 tablespoon Choc Shot
(I used the Orange Spice flavour, you could try original chocolate or coconut)
Click HERE for Choc Shot review)

20g cocoa powder/pollenta/rice flour/fine biscuit crumbs for coating

optional;
dried rose petals to decorate

***


Simply combine the cashew nuts, raisins and dates in a food processor. Blitz until finely chopped.


The mixture will be quite grainy until you add the Choc Shot. This is the magic ingredient that will combine it into a paste-like consistency and give the 'truffles' a rich chocolate flavour.


Blitz for a few seconds to bring the mixture together.


Using a half-tablespoon, roll each measure into a ball. The mixture is quite sticky.


Roll in the coating of your choice. I tried pollenta but I prefer cocoa as they look like authentic truffles coated in this fine chocolatey dusting.
If you find cocoa too strong, you can use drinking chocolate powder.


Pop onto a plate and chill if possible for a couple of hours to harden them up a little.
The mixture should make around 16 'truffles' if you measure accurately.


Pop into miniature petit four cases. You can decorate with a few dried rose petals, chopped nuts or just leave plain and simple.

***

Truffliscious!

***

Tips

You can ring the changes by using mixed nuts, dried fruit mixes containing cranberries, papaya, apricots-whatever you like best. Always mix with the dates as this gives it the best rich texture. 

*

Once hardened in the fridge, these can be stacked into little glass jars or wrapped in cellophane to make lovely little gifts. 

***

PRINT RECIPE HERE
Wednesday, 16 December 2015 - , , , , , , , , , 0 comments

RECIPE : Mince Pie 'Cinnamon Sticks'


I was asked to bring a low fat treat to my WeightWatchers meeting this week and I couldn't think of anything more festive and cute than my mince pie 'cinnamon sticks'.
These crisp little icing-sugar dusted gems are so quick and simple to make, fill the kitchen with a wonderfully authentic Christmas aroma and won't damage your waistline either!
The beauty of this recipe is that you can make a few at a time or a large batch which will keep for a few days. I made 54 in just over an hour including the tying of the bundles!

***

They work out to 1sp/1pp/approx.58kcal per stick or 3sp/3pp/approx.174kcal per tied bundle of 3 sticks-less than half the smartpoints/propoints/calories of a standard mince pie!

***

YOU WILL NEED : (Per 6 sticks)

1 sheet filo pastry
40g mincemeat
(I used a Tesco one with vegetarian suet which worked out to 1pp per 10g)
Frylight oil
1 teaspoon ground cinnamon
1/2 teaspoon icing sugar

*

String for tying the bundles

***

Preheat the oven to 180C/350F/Gas4


Line your baking tray with non stick baking paper.


Weigh the mincemeat into a small ramekin pot. Even if you are making a large batch, weigh the mincemeat in 40g measures per 6 sticks. It's easier to portion it out evenly if you do this.


Take a sheet of filo pastry and place flat on your work surface. If making a larger batch, you can work with 2-3 sheets at a time.


Roll and wrap any remaining filo pastry in clingfilm even if making a large batch. This will prevent it from drying out in the air.


Cut the sheet of filo pastry into 6 even rectangles using kitchen scissors.


Divide the mincemeat equally between all 6 filo rectangles. Place it in a rough line towards one end of each rectangle. Leave space at the edges as it will ooze out when baking.


Working quickly to prevent the pastry from drying out, fold the short end over the mincemeat.


Then roll up quite tightly until you have formed a little tube about the size of a cinnamon stick.


Repeat the process until you have made as many as you are planning to do. Put them seam-side down onto the baking tray and mist with Frylight oil.


Sprinkle with cinnamon-it can be quite uneven.


Bake for 15-20 minutes in a preheated oven at 180C/350F/Gas4 until crisp to the touch and pale golden in colour. Pop onto a wire rack to cool. Don't worry if some of the mincemeat has oozed out, or if the pastry flakes a little.
These are meant to look rustic!


While the sticks are cooling, select your serving plate and decorative string. I used this lovely cotton bakers' string traditionally used to tie around artisan loaves of bread.


Once cooled, tie the sticks in bundles of 3 then place back on the cooling rack to be dusted with icing sugar.


I buy my icing sugar in a dredger that dispenses a very light, even dusting. You could use a sieve and a teaspoon. You only need a little just to cover any messy areas and make them look festive and professional.


Finally, stack the bundles in a random pile onto your serving plate.


If making these in advance, allow to cool completely before popping into an airtight container where they will stay fresh for a few days. You can reheat gently in a very low oven (even with the string on) if you like to serve them warm.

***

TIPS

You could serve these warmed as a dessert with some Slicecream parlour cinnamon icecream
(Click HERE for recipe)
Or a dollop of Total Greek Yoghurt

*

PRINT RECIPE HERE
Monday, 7 December 2015 - , , , , , , 0 comments

RECIPE: Christmas Coleslaw


I know it's Brussels sprout time of year...but they don't always have to be hot and served traditionally. There's no reason why you can't eat them raw in a salad!
This gorgeous vibrant coleslaw uses shredded Brussels sprouts instead of cabbage for a funky twist on my traditional coleslaw-(they're just like mini cabbages anyway!)
A wonderful, crunchy accompaniment to left-over turkey or salmon or even a simple jacket potato.

***

This WHOLE bowl is 1pp/approx.180kcal and is enough for 4 generous portions, so each portion is 0pp/approx.45kcal!
(When you compare this to a shop-bought coleslaw which is around 3pp/140kcal PER TABLESPOON I think you'll agree I'm onto a winner here!)

***

YOU WILL NEED : (Serves 4)

3 medium carrots
20 Brussels sprouts
2 Spring onions

For the dressing;

80g Total 0% or 2% fat Greek yoghurt

juice of 1 lemon 
OR
juice of 1 lime
OR
1-2 tablespoons white wine vinegar or seasoned rice wine vinegar

1-2 teaspoons granular artificial sweetener

lashings of freshly ground black pepper

***


In a large mixing bowl, weigh out the yoghurt. Add the lemon/lime juice or vinegar depending on your preference.


Mix really well until smooth and creamy, then add the sweetener and black pepper. Sweetening the dressing is so important as it balances out the acidity. Keep tasting until it's just how you like it- more tangy, extra creamy, a pepper kick etc.


Once you're happy with the flavour, slice the Spring onions and add to the dressing.
Depending on the gadgets you have, either pop the carrots into a food processor on a course grater mode....or grate coarsely by hand...or  use a julienne peeler to make lovely long thin strips of carrot.

*


Slice the Brussels sprouts really finely with a sharp knife for a great texture.

*

Now add the shredded veggies a handful at a time to the dressing and coat well with the dressing each time using a metal spoon. You just seem to get the best coverage with this technique and everything ends up with an even coating. 

Taste again, adjust any flavours then transfer to your serving bowl. It's just so fresh, clean and delicious!
This will keep for a couple of days in the fridge but is at its best when freshly made.

***

Brilliantly Brussels

***

To Ring The Changes...


Add caraway seeds for an aniseed tang.

*

Add dill or chopped chives to the dressing.

*